Configure Sharepoint (MOSS) Single Sign-On

Posted by Unknown on Tuesday, January 11, 2011

.
  1. http://www.thorprojects.com/blog/archive/2008/08/02/moss-single-sign-on-setup-step-by-step.aspx
  2. http://www.sharepointblogs.com/michael/archive/2007/07.aspx
  3. http://www.sharepointblogs.com/llowevad/archive/2007/06/25/sharepoint-2007-single-sign-on-setup.aspx
First step is to create 2 domain security groups (SSOADMINS and SSOMANAGERS), set the Group Scope as Global and Group Type as Security.
Create a domain user account (SSOADMIN) and make it a member of the SSOADMINS group, and also make SSOADMIN a member of the Administrators group on the encryption key server (SSO service server – see below). Also make any other user accounts who will manage Sharepoint SSO service settings members of the SSOADMINS group.
Add user accounts as members of the SSOMANAGERS group, for those accounts who will manage Single Sign-On Enterprise Application Definition settings.
Ensure that the SSOADMIN user is a member of the local Administrators group on each WFE server.

Create a login for the SSOADMIN user on the Sharepoint SQL Server machine and assign them to the dbcreator and securityadmin roles.
After making changes to domain accounts / groups, it might be a good idea if your re-logon/restart your MOSS server. Also it may be worthwhile logging into your MOSS server as the SSOADMIN user while configuring SSO Server settings.  Last time I configured SSO I kept getting the “You do not have sufficient rights to perform this operation” error message, which I solved by logging in as the SSOADMIN user to make those changes.
Configure the Microsoft Single Sign-On Service (services snap-in) to start automatically using the SSOADMIN user account for it’s logon details. This must be done on each WFE server and also on the Indexing server.
* Note: Do not start the SSO service on any server yet, the first server on which the SSO service is started becomes the encryption key server.
On the machine you’ve decided will be the encryption key server, start the SSO service. On this machine, log into Sharepoint Central Admin.
Add the SSOADMIN user to the farm administrators group.
In Site Settings -> Permissions, add the SSOADMINS and SSOMANAGERS groups and give them Read permissions.
In Operations -> Service Accounts, select the Single Sign-On service and set the credentials to the SSOADMIN user account.
In Operations -> Manage Settings for Single Sign-On, select Manage Server Settings; 
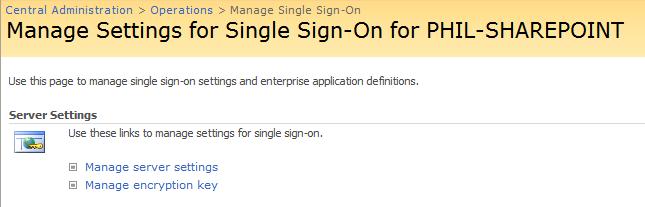
Set the Single Sign-On Administrator Account to the SSOADMINS group.
Set the Enterprise Application Definition Administrator Account to the SSOMANAGERS group.
Leave the remaining options as default and click OK.
If you see an error message displayed to the effect that you don’t have enough permissions, rights, access denied etc, check that you’ve configured the logins on SQL Server, made the SSOADMIN a local Administrator, finally you might login as SSOADMIN while you make these changes.
In Operations -> Manage Settings for Single Sign-On, select Manage Encryption Key;
Click Create Encryption Key, once this is finished you’ll probably want to back it up.
At this point you’re ready to start creating Enterprise Application Definitions and setting credentials for those EAD’s.

More Here


Courtesy:http://platinumdogs.wordpress.com/2008/10/30/configure-sharepoint-moss-single-sign-on/
More aboutConfigure Sharepoint (MOSS) Single Sign-On

Configuring Apache with Open SSL

Posted by Unknown on Monday, January 10, 2011

Downloading Resources
1- Download Apache Server from the following location with SSL Support
http://mirror.cloudera.com/apache//httpd/binaries/win32/httpd-2.2.17-win32-x86-openssl-0.9.8o.msi
2- Down load OpenSSL from the following location:
http://www.thompsonbd.com/files/apache/Openssl-0.9.7e-Win32.zip
Installing Apache
Install Apcher Server with Default settings and make sure no other application is running on ports 80 and 443.

Installing OpenSSL
Unzip the file Openssl-0.9.7e-Win32.zip and copy the extracted folder on drive C and rename it a Openssl.
Certificate Generation
1- Navigate to Openssl folder using command line.
2- Execute the following:
  • openssl req -config openssl.cnf -new -out mycert.csr -keyout mycert.pem
  • openssl rsa -in mycert.pem -out mycert.key
  • openssl x509 -in mycert.csr -out mycert.cert -req -signkey mycert.key -days 365
Copy the .cert and .key files to C:\Program Files\Apache Software Foundation\Apache2.2\conf
Enable SSL on Apache
1- Open httpd.conf file available at C:\Program Files\Apache Software Foundation\Apache2.2\conf and uncomment the following lines by removing #:
  • #LoadModule ssl_module modules/mod_ssl.so
  • #Include conf/extra/httpd-ssl.conf
2- Open httpd-ssl.conf file available at  and enter certificate and key values as given below:
#   Server Certificate:
SSLCertificateFile “C:/Program Files/Apache Software Foundation/Apache2.2/conf/mycert.cert”
#   Server Private Key:

More Here


Courtesy:http://abrarhashmi.wordpress.com/2011/01/09/configuring-apache-with-open-ssl/
More aboutConfiguring Apache with Open SSL

Leverage and Extend Claims based identity in SharePoint 2010

Posted by Unknown

Windows Identity Foundation (WIF) is the platform on which SharePoint 2010 claims authentication is based. WIF, which is fully supported in SharePoint 2010, ADFS 2.0, ASP.NET, Windows Communication Foundation (WCF), and any other .NET application you care to develop, provides the infrastructure necessary to generate, transmit, and process claims-based identity in a simple and straightforward manner. It removes the roadblocks imposed by legacy authentication schemes like NTLM and Kerberos and puts control directly into the hands of developers, users, and IT security professionals. long story short, it’s a framework written to help solve identity issues common in the of cloud computing and service-oriented architecture.


The idea of claims based identity is one that many people are willing to try. Getting accurate information out there to the public though does take time.

The important point is this is based on industry standards. Many different entities are on board along with Microsoft in this matter. The digital world continues to give us new opportunities and those involved believe that this will help all of us to get the most out of it. There is a strong foundation in place to continue building upon. The use of AD FS v2, CardSpace, and Windows Identity Foundation are all important pieces of this puzzle.


As a demonstration of these capabilities, I’ll show how SharePoint 2010, WCF,and WIF can be put together to solve the identity delegation problem. In this demo session part 1 I start establishing the trust relationship between ADFS 2.0 and SharePoint with PowerShell and demonstrate how the claims get into SharePoint.Then we build and deploy a claims viewer Webpart with WIF programming model. In part 2 We start with a web service that is front-ending line-of-business information stored in a SQL database. Then, we’ll configure it to use WIF to request the calling user’s claims from SharePoint and process the token so that authorization decisions can be made. we’ll surface this information in SharePoint 2010 as an External Content Type using Business Connectivity Services (BCS).


More Here


Courtesy:http://sptechpoint.wordpress.com/2010/11/23/whats-new-in-sharepoint-2010-security/
More aboutLeverage and Extend Claims based identity in SharePoint 2010

Access OWA with ADFS

Posted by Unknown

One of the biggest advantages of using ADFS for your web applications (or any federated identity product for that matter) is that you can take advantage of the claims being passed to the application in the token. This data can be used by the application for making decisions about what the user will see – in other words, authorization. Or that identity data could be used for user personalization – such as displaying the text “Welcome, Ken”.
But what if your application doesn’t support claims? Do you need to rewrite it? In some cases, the answer is no – and what I’m talking about here today is one of those cases. You see, it is possible to use ADFS on applications that aren’t claims-aware, and what better to illustrate that on than Outlook Web App. In this post, I’m going to show you how to enable ADFS v2 for logging on to Outlook Web App in Exchange Server 2010.

The Mechanics of How This Works

Before we get started, let me explain a little bit about how this works. Outlook Web App is just like any other ASP.Net application – it uses IIS for hosting the site, which means that IIS also handles authentication for the web app.
Now, typically, applications that are claims aware use Windows Identity Foundation (WIF). WIF is the API that does all of the token-handling things that the application needs to happen. If I want to use ADFS and claims-based access in my application, I would use WIF as a fundamental component of that app. WIF would do a lot of the heavy lifting so my app doesn’t have to. For example, WIF would take care of receiving the token from ADFS, verifying that it’s legitimate, and even taking the claims out of it and making them consumable by my application.

WIF uses an HTTP module that listens for unauthenticated requests to the application and then takes over. For example, if I access an application without having logged in already, WIF will step in and take care of redirecting me to the ADFS server that it trusts – whom I might use for authentication. We add this HTTP module to an application by putting it in the app’s web.config file. Easy enough.
So what happens after I’m authenticated and my federated identity token is returned to the app? Typically, the token would be validated and parsed so that the claims can be used. However, let’s say that I’m using an app like OWA. OWA doesn’t know anything about claims and tokens, so if I gave it an ADFS token, it wouldn’t know what to do with it.
So what can we do? In older versions of ADFS (v1), there was an agent that you could install on the web server called the NT Token agent. This agent would sit on the server as an ISAPI filter, and after the token is passed to the server, it would map it to an Active Directory account and create an NT token for the user. This effectively turned an ADFS token into an NT token. This way, the application did not require claims – any old app could use ADFS for authentication. The only requirement was that an account has to exist in Active Directory for the user.
The NT Token agent got canned with ADFS v1 and is no longer available in ADFS v2. Some people found this disappointing, but one thing that many people missed is that we now have something even better. When you install WIF on a server, it installs a new Windows service that is Disabled by default. This service is called the Claims to Windows Token Service – or C2WTS. This service effectively does the same thing as the NT Token agent used to do – it turns an ADFS token into a Windows token. However, this time it doesn’t use an NT token – rather, it uses Kerberos Constrained Delegation (KCD) to request a Kerberos ticket on behalf of the identity specified in the UPN claim of the token. The target scenario of this capability is being able to use Kerberos delegation from a claims-based web app to a back-end system such as SQL Server.
Now, if we enable the C2WTS service, it basically steps in when a token is received, gets a Kerberos ticket, and passes it to the app instead. Since OWA is an ASP.Net application, and since it can use Windows Integrated Authentication, there is no reason why we should not be able to configure this in OWA.

Configuring OWA for ADFS

At a high level, here are the things that we are going to do to federate OWA with ADFS:
  • Make sure OWA works fine without ADFS first
  • Install WIF on the Exchange Client Access Server
  • Configure the OWA web.config file to use the WS-Federation Authentication Module supplied by WIF
  • Enable and configure the Claims to Windows Token Service
  • Configure the Relying Party trust in ADFS

Step 1: Make Sure that OWA is Working Without ADFS

This may be common sense, but it’s a good idea to make sure that OWA is working normally before getting started. In this example, I’ve installed Exchange 2010 on a server called CONTOSO-EX1 and URL for OWA is mail.contoso.com. As you can see, when I browse to OWA, I’m prompted for my Active Directory credentials in Exchange’s Forms Based Authentication page.
image

Step 2: Install Windows Identity Foundation

The next thing to do is to install Windows Identity Foundation on the Client Access Server. You can download WIF from here. After you install WIF, you should see a new service on the Client Access Server called the Claims to Windows Token Service. This service is not enabled by default. This is what we will be using to turn our SAML token into a Kerberos ticket.
image

Step 3: Install the Windows Identity Foundation SDK

You installed WIF in the previous step, so you may be wondering why you need the SDK. There is one tool included in the SDK that you need – FedUtil.exe. If you have the SDK installed somewhere else, you can just grab that tool from the SDK and copy it to the Client Access Server. Otherwise, you can download the WIF SDK from here and install it on the Client Access Server. After you install the WIF SDK, you should have FedUtil in the “c:\Program Files (x86)\Windows Identity Foundation SDK\v3.5\” folder.
image

Step 4: Configure OWA

Now, you need to run the utility called FedUtil.exe. This tool will update the web.config file for OWA and configure it to trust the ADFS server. You will find the tool on the Client Access Server under “c:\Program Files (x86)\Windows Identity Foundation SDK\v3.5\”. When you run FedUtil.exe, you will get the following dialog:
image
For the Application Configuration Location field, enter the path to the OWA web.config, which will be “c:\Program Files\Microsoft\Exchange Server\V14\ClientAccess\Owa\web.config” if you are using a default installation of Exchange.
In the Application URI field, enter the URL for OWA – https://mail.contoso.com/owa in my example.
After you click Next, you will need to enter the URL of your ADFS server so FedUtil can grab the federation metadata file. You can just type in the DNS name of the ADFS service, and FedUtil will fill in the rest.
image
You can walk through the rest of wizard, leaving everything else at the default value. If you were to browse to OWA now, you would see that the authentication module is working, and it will redirect you to the ADFS server instead of presenting you with the OWA forms-based logon page. You can see from the following screen capture that I’m being asked to logon at sts.contoso.com (the ADFS server) instead of mail.contoso.com (the Exchange server).
image
However, we don’t have the ADFS side of the trust configured yet. And even if we did, OWA would get the SAML token back from ADFS and not know what to do with it because we didn’t configure C2WTS yet.
But before we do, there is one other thing we have to do in OWA. We need to turn off Forms Based Auth. In the Exchange Management Console, open your OWA authentication settings dialog and tell OWA to use IIS. You can get to this dialog by choosing Server Configuration > Client Access, and then select the OWA virtual directory in the bottom pane of the Exchange Management Console.
image
Just choose Properties to bring up the configuration dialog. Go to the Authentication tab and set the option to “Use one or more standard authentication methods”.
image
Then, you’ll need to go into IIS on the Client Access server and enable Anonymous Authentication on the OWA virtual directory. To do this, open IIS Manager, browse to the OWA virtual directory, and double-click on the Authentication icon.
image
Set the Anonymous Authentication setting to Enabled. After you are done, make sure that you run iisreset.
image

Step 5: Configure C2WTS

There are a few things that you need to do to configure C2WTS. The first is to configure the service and turn it on. To configure it, you will need to allow the Exchange server to use it by modifying C2WTS’es configuration file. You will find this file in “C:\Program Files\Windows Identity Foundation\v3.5\c2wtshost.exe.config”. Open the file in Notepad, and uncomment the following line:
image
Save the file, and then set the C2WTS service to Automatic and start it up.
image
The second thing is that you need to go back into the OWA web.config file and tell WIF to use C2WTS to turn the SAML token into a Windows token instead of giving the SAML token back to OWA directly. So go back into OWA’s web.config file, scroll all the way down near the bottom, and add the following text into the Microsoft.IdentityModel element under the Service element:


Two main things that we’re adding here are the parameters mapToWindows and useWindowsTokenService. These two things enable OWA to use C2WTS. Here’s a screen capture of the modified file after the text was added:
image

Step 6: Set up Relying Party Trust in ADFS

The last step is to add the Relying Party side of the trust in ADFS. You can do this using the standard Add Relying Party Trust wizard in ADFS and using OWA’s Federation Metadata file, which was created in step 4 when we ran FedUtil. In the RP trust wizard, enter the URL for OWA. The wizard will take care of finding the Federation Metadata file, so you don’t have to specify the full path to it.
image
You can just specify the default values for the rest of the wizard. After you are done, you may get the Claims Rules dialog for the trust. If you do, you can just close it for now.
In order for C2WTS to work, you need to pass a UPN claim in the SAML token. C2WTS uses the UPN claim to look up the user that you want to create the Windows Token for in Active Directory. So, now we need to configure a couple of claim rules to get the UPN out of Active Directory and into the SAML token passed to OWA.
First, we need to make sure that the UPN claims is coming in from Active Directory.
  1. In ADFS, go to your Claims Provider Trusts, select the Active Directory claims provider, and choose Edit Claim Rules.image
  2. In the Edit Claim Rules dialog, click the Add Rule button.
  3. In the rule wizard, choose the “Send LDAP Attributes as Claims” template
  4. In the rule configuration screen, select the Active Directory attribute store and choose to send LDAP attribute User-Principle-Name in the Outgoing Claim Type labeled UPN, as shown in the following screen capture. image
The second thing we need to do is to configure ADFS to pass the UPN claim to OWA.
  1. In the ADFS Management Tool, go to the Relying Party Trust that you created for OWA and choose to edit the claim rules there. image
  2. In the Issuance Transform Rules tab, click the Add Rule button.
  3. In the rule wizard, use the template called Pass Through or Filter an Incoming Claim
  4. In the Incoming Claim Type field, select the UPN claim and choose “Pass through all claim values”, as shown in the following screen capture: image

Trying it Out

Now that everything is configured, we can try it out. Before you do, make sure that the account you are testing has a valid mailbox in Exchange and also has the UPN attribute populated in Active Directory.
Using my client, I will browse to https://mail.contoso.com, and I am re-directed to ADFS to log in. I’ll log in with my user’s credentials:
image
And voila… I’m now logged into OWA via ADFS -

More Here


Courtesy:http://olegsoroka.wordpress.com/2010/12/13/access-owa-with-adfs/
More aboutAccess OWA with ADFS

Happy New Year & "No Tan Jan"

Posted by Unknown

From the desk of Leah Calnan, Director of Metro Property Management...

Well it’s the New Year 2011 and we are off and racing like most of you out there and feeling a little more refreshed. The office is a buzz with plenty of properties to lease, twilight & weekend open homes are in full swing and the listing of numerous new properties from existing as well as brand new clients. We are also gradually updating the interior of our offices with new painting, tiling, carpet & a kitchen upgrade which all make an exciting start to the year.

As you would know by now when we see a fantastic cause we like to get right behind it and this month we are supporting “No Tan Jan”. For the month of January we are encouraged by the Warwick Foundation to give up tanning (in the sun & with the use of solariums) for good and change the way Australians view tanning in general. The foundation is Australia's first and only organisation focused on supporting 18 - 40 year olds with cancer. They are encouraging us this month to “Fake It! Don’t Bake It!”

Their website (http://ow.ly/3BwqT) states that ...sadly, melanoma is the most common cancer for this age group and we want that to change! ‘No Tan Jan’ is all about ditching the solarium, breaking up with sun baking and embracing fake tan for the month of January. At the same time you will raise much needed funds for all young adults with cancer.

Being part of “No Tan Jan” is so easy! You just need to register, set up your personal fundraising page and give up solariums and sun baking for the month of January. If you must have a tan, then make sure it is fake.

The Warwick Foundation asks you to have your family, friends and co-workers to sponsor you for encouragement! This will not only help you kick the habit for good and decrease your chances of developing skin cancer, but you will also be supporting all young adults with the disease.

There are many companies willing to donate proceeds from spray tanning and related products to the foundation so check out the companies involved and purchase your products from them http://ow.ly/3BxlT .

If you’d simply like to donate to this foundation to support this specialised group of 18-40 yr olds living with cancer then please go to this page http://ow.ly/3BwwO and simply make your donation.

And remember it is important to get your fake tan right! As the Warwick Foundation state on their site you don’t want to end up looking like bad fake tan victims Donald Trump or Paris Hilton, worse still with a real tan like Donatella Versace!!!


Until next time...
More aboutHappy New Year & "No Tan Jan"